Now the problem begins when svchost.exe (netsvcs) start taking almost all of the Windows resources and causes a High CPU usage. If you looked into Task Manager, you would find that a particular svchost.exe is taking up almost all the memory and creating a problem for other programs or applications. The computer becomes unstable as it becomes very sluggish and it starts freezing Windows randomly, then the user either has to reboot their system or force shutdown. Svchost.exe High CPU Usage problem occurs mostly because of virus or malware infection on users PC. But the problem is not limited to only this as it generally depends on users system configuration and the environment. So without wasting any time let’ see how to actually Fix High CPU Usage by svchost.exe (netsvcs) with the below-listed troubleshooting guide.
Fix High CPU Usage by svchost.exe (netsvcs)
Make sure to create a restore point just in case something goes wrong.
Fix High CPU Usage by svchost.exe (netsvcs) Method 1: Run CCleaner and Malwarebytes Method 2: Disable the particular service that is causing High CPU Method 3: Clear Event Viewer Logs Method 4: Rename SoftwareDistribution Folder Method 5: Run Windows Update Troubleshooter Method 6: Make sure to Update Windows Method 7: Disable the BITS and Windows Update service Method 8: Download & Run RKill Method 9: Run System File Checker (SFC) and Check Disk (CHKDSK) Method 10: Run System and Maintenance Troubleshooter
Method 1: Run CCleaner and Malwarebytes
Download and install CCleaner & Malwarebytes. 2. Run Malwarebytes and let it scan your system for harmful files. If malware is found, it will automatically remove them.
Now run CCleaner and select Custom Clean.
Under Custom Clean, select the Windows tab and checkmark defaults and click Analyze.
5. Once Analyze is complete, make sure you’re certain to remove the files to be deleted.
Finally, click on the Run Cleaner button and let CCleaner run its course.
To further clean your system, select the Registry tab, and ensure the following are checked:
Click on the Scan for Issues button and allow CCleaner to scan, then click on the Fix Selected Issues button.
When CCleaner asks “Do you want backup changes to the registry?” select Yes.
Once your backup has completed, click on the Fix All Selected Issues button.
Restart your PC to save changes.
Method 2: Disable the particular service that is causing High CPU
Press Ctrl + Shift + Esc together to launch Task Manager.
Switch to Details tab and right-click on the high CPU usage svchost.exe process and choose Go to Service(s).
This would automatically take you to the Services tab, and you will notice that there are several highlighted services that run under the svchost.exe process.
Now right-click on the highlighted service one by one and select Stop.
Do this until the high CPU usage by that particular svchost.exe process is fixed.
Once you have verified the services because of which this problem has occurred, it’s time to disable that service. Note: Most of the time, Windows Update Service is the culprit service, but we will deal with it later on.
Press Windows Key + R then type services.msc and hit Enter.
Now find that particular service in this list then right-click on it and select Properties.
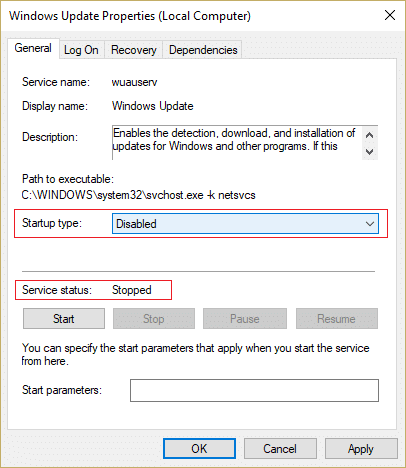
Click Stop if the service is running and then make sure Startup type is set to Disable and click Apply followed by OK.
Reboot your PC to save changes and see if the issue is resolved or not This would definitely Resolve High CPU Usage by svchost.exe (netsvcs). If you find it difficult to zero in on the particular svchost.exe file causing the issue, you could use a Microsoft program called Process Explorer, which would help you find the cause of the problem.
Method 3: Clear Event Viewer Logs
Press Windows Key + R then type eventvwr.msc and hit Enter to open Event Viewer.
From the left-hand side menu, expand Windows Logs and then right-click on the subfolders one by one and choose Clear Log.
These subfolders will be Application, Security, Setup, System and Forwarded Events.
Make sure you clear the event logs for all the above folders.
Reboot your PC to save changes.
Method 4: Rename SoftwareDistribution Folder
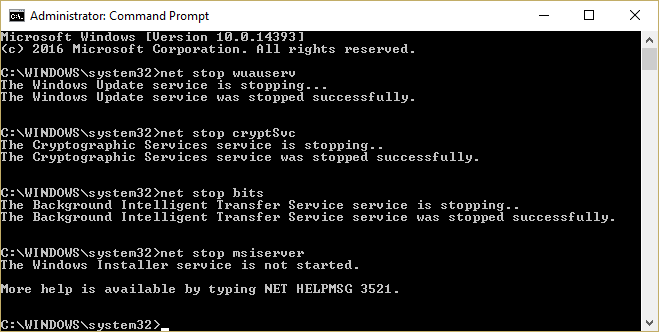
1.Press Windows Key + X then select Command Prompt (Admin). 2. Now type the following commands to stop Windows Update Services and then hit Enter after each one: net stop wuauserv net stop cryptSvc net stop bits net stop msiserver
Next, type the following command to rename SoftwareDistribution Folder and then hit Enter: ren C:\Windows\SoftwareDistribution SoftwareDistribution.old ren C:\Windows\System32\catroot2 catroot2.old
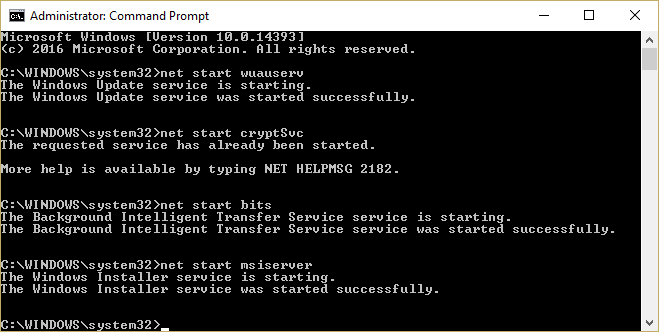
Finally, type the following command to start Windows Update Services and hit Enter after each one: net start wuauserv net start cryptSvc net start bits net start msiserver
Reboot your PC to save changes.
Method 5: Run Windows Update Troubleshooter
Type “troubleshooting” in the Windows Search bar and click on Troubleshooting.
Next, from the left window, pane select View all.
Then from the Troubleshoot computer problems list select Windows Update.
Follow on-screen instruction and let the Windows Update Troubleshoot run.
Restart your PC to save changes. This should help you fix High CPU Usage by svchost.exe (netsvcs) but if not then continue with the next method.
Method 6: Make sure to Update Windows
Press Windows Key + I then select Update & Security.
Next, click Check for updates and make sure to install any pending updates.
After the updates are installed, reboot your PC to Fix High CPU Usage by svchost.exe (netsvcs).
Method 7: Disable the BITS and Windows Update service
Press Windows Key + R then type services.msc and hit Enter.
Now find BITS and Windows Update in the list then right-click on them and select Properties.
Make sure to click Stop and then set up their Startup type to Disabled.
Click Apply, followed by OK.
Reboot your PC to save changes. This should help you fix High CPU Usage by svchost.exe (netsvcs) but if not then continue with the next method.
Method 8: Download & Run RKill
Rkill is a program that was developed at BleepingComputer.com that attempts to terminate known malware processes so that your normal security software can then run and clean your computer of infections. When Rkill runs, it will kill malware processes and then remove incorrect executable associations and fixes policies that stop us from using certain tools when finished. It will display a log file that shows the processes that were terminated while the program was running. This should resolve High CPU Usage by svchost.exe issue. Download Rkill from here, install and run it.
Method 9: Run System File Checker (SFC) and Check Disk (CHKDSK)
Press Windows Key + X then click on Command Prompt(Admin).
Now type the following in the cmd and hit enter:
Wait for the above process to finish and once done, restart your PC.
Next, run CHKDSK from Fix File System Errors with Check Disk Utility(CHKDSK).
Let the above process complete and again reboot your PC to save changes.
Method 10: Run System and Maintenance Troubleshooter
Press Windows Key + X and click on Control Panel.
Search Troubleshoot and click on Troubleshooting.
Next, click on view all in the left pane.
Click and run the Troubleshooter for System Maintenance.
The Troubleshooter may be able to Fix High CPU Usage by svchost.exe (netsvcs). Recommended:
Fix High CPU Usage By TiWorker.exe 10 ways to fix A disk read error occurred Fix Non-System Disk or Disk Error Message Fix High CPU Usage by RuntimeBroker.exe
That’s it you have successfully Fix High CPU Usage by svchost.exe (netsvcs) but if you still have any questions regarding this post then feel free to ask them in the comment’s section.


![]()


