Fix Windows Update Error 80246008
Make sure to create a restore point just in case something goes wrong.
Fix Windows Update Error 80246008 Method 1: Make Sure BITS and COM+ Event System Services are running Method 2: Registry Fix Method 3: Run Windows Update Troubleshooter Method 4: Reset Windows Update Components
Method 1: Make Sure BITS and COM+ Event System Services are running
Press Windows Keys + R then type services.msc and hit Enter.
Now find BITS and COM+ Event System Services, then double click on each of them.
Make sure the Startup type is set to Automatic, and each of the above services is running, if not then click on the Start button.
Click Apply, followed by OK.
Reboot your PC and again try to update Windows.
Method 2: Registry Fix
Open Notepad and copy the below content as it is: Windows Registry Editor Version 5.00 [HKEY_LOCAL_MACHINE\SYSTEM\CurrentControlSet\services\BITS] “DisplayName”=”@%SystemRoot%\system32\qmgr.dll,-1000” “ImagePath”=hex(2):25,00,53,00,79,00,73,00,74,00,65,00,6d,00,52,00,6f,00,6f,00,\ 74,00,25,00,5c,00,53,00,79,00,73,00,74,00,65,00,6d,00,33,00,32,00,5c,00,73,\ 00,76,00,63,00,68,00,6f,00,73,00,74,00,2e,00,65,00,78,00,65,00,20,00,2d,00,\ 6b,00,20,00,6e,00,65,00,74,00,73,00,76,00,63,00,73,00,00,00 “Description”=”@%SystemRoot%\system32\qmgr.dll,-1001” “ObjectName”=”LocalSystem” “ErrorControl”=dword:00000001 “Start”=dword:00000002 “DelayedAutoStart”=dword:00000001 “Type”=dword:00000020 “DependOnService”=hex(7):52,00,70,00,63,00,53,00,73,00,00,00,45,00,76,00,65,00,\ 6e,00,74,00,53,00,79,00,73,00,74,00,65,00,6d,00,00,00,00,00 “ServiceSidType”=dword:00000001 “RequiredPrivileges”=hex(7):53,00,65,00,43,00,72,00,65,00,61,00,74,00,65,00,47,\ 00,6c,00,6f,00,62,00,61,00,6c,00,50,00,72,00,69,00,76,00,69,00,6c,00,65,00,\ 67,00,65,00,00,00,53,00,65,00,49,00,6d,00,70,00,65,00,72,00,73,00,6f,00,6e,\ 00,61,00,74,00,65,00,50,00,72,00,69,00,76,00,69,00,6c,00,65,00,67,00,65,00,\ 00,00,53,00,65,00,54,00,63,00,62,00,50,00,72,00,69,00,76,00,69,00,6c,00,65,\ 00,67,00,65,00,00,00,53,00,65,00,41,00,73,00,73,00,69,00,67,00,6e,00,50,00,\ 72,00,69,00,6d,00,61,00,72,00,79,00,54,00,6f,00,6b,00,65,00,6e,00,50,00,72,\ 00,69,00,76,00,69,00,6c,00,65,00,67,00,65,00,00,00,53,00,65,00,49,00,6e,00,\ 63,00,72,00,65,00,61,00,73,00,65,00,51,00,75,00,6f,00,74,00,61,00,50,00,72,\ 00,69,00,76,00,69,00,6c,00,65,00,67,00,65,00,00,00,00,00 “FailureActions”=hex:80,51,01,00,00,00,00,00,00,00,00,00,03,00,00,00,14,00,00,\ 00,01,00,00,00,60,ea,00,00,01,00,00,00,c0,d4,01,00,00,00,00,00,00,00,00,00 [HKEY_LOCAL_MACHINE\SYSTEM\CurrentControlSet\services\BITS\Parameters] “ServiceDll”=hex(2):25,00,53,00,79,00,73,00,74,00,65,00,6d,00,52,00,6f,00,6f,\ 00,74,00,25,00,5c,00,53,00,79,00,73,00,74,00,65,00,6d,00,33,00,32,00,5c,00,\ 71,00,6d,00,67,00,72,00,2e,00,64,00,6c,00,6c,00,00,00 [HKEY_LOCAL_MACHINE\SYSTEM\CurrentControlSet\services\BITS\Performance] “Library”=”bitsperf.dll” “Open”=”PerfMon_Open” “Collect”=”PerfMon_Collect” “Close”=”PerfMon_Close” “InstallType”=dword:00000001 “PerfIniFile”=”bitsctrs.ini” “First Counter”=dword:0000086c “Last Counter”=dword:0000087c “First Help”=dword:0000086d “Last Help”=dword:0000087d “Object List”=”2156” “PerfMMFileName”=”Global\MMF_BITS_s” [HKEY_LOCAL_MACHINE\SYSTEM\CurrentControlSet\services\BITS\Security] “Security”=hex:01,00,14,80,94,00,00,00,a4,00,00,00,14,00,00,00,34,00,00,00,02,\ 00,20,00,01,00,00,00,02,c0,18,00,00,00,0c,00,01,02,00,00,00,00,00,05,20,00,\ 00,00,20,02,00,00,02,00,60,00,04,00,00,00,00,00,14,00,fd,01,02,00,01,01,00,\ 00,00,00,00,05,12,00,00,00,00,00,18,00,ff,01,0f,00,01,02,00,00,00,00,00,05,\ 20,00,00,00,20,02,00,00,00,00,14,00,8d,01,02,00,01,01,00,00,00,00,00,05,0b,\ 00,00,00,00,00,18,00,fd,01,02,00,01,02,00,00,00,00,00,05,20,00,00,00,23,02,\ 00,00,01,02,00,00,00,00,00,05,20,00,00,00,20,02,00,00,01,02,00,00,00,00,00,\ 05,20,00,00,00,20,02,00,00
Now from Notepad menu, click on File then click Save As.
Select your desired location (most preferably Desktop) and then name the file as BITS.reg (the .reg extension is important).
From the Save as type drop-down select All file and then click Save.
Right-click on the file (BITS.reg) and select Run as Administrator.
If will give warning, select Yes to continue.
Reboot your PC to save changes.
Open Command Prompt. The user can perform this step by searching for ‘cmd’ and then press Enter.
Type the following command into cmd and hit Enter after each one: NET START BITS NET START COM+ EVENT SYSTEM SC QC BITS SC QUERYEX BITS SC QC EVENTSYSTEM
Again try to Update Windows and see if you’re able to Fix Windows Update Error 80246008.
Method 3: Run Windows Update Troubleshooter
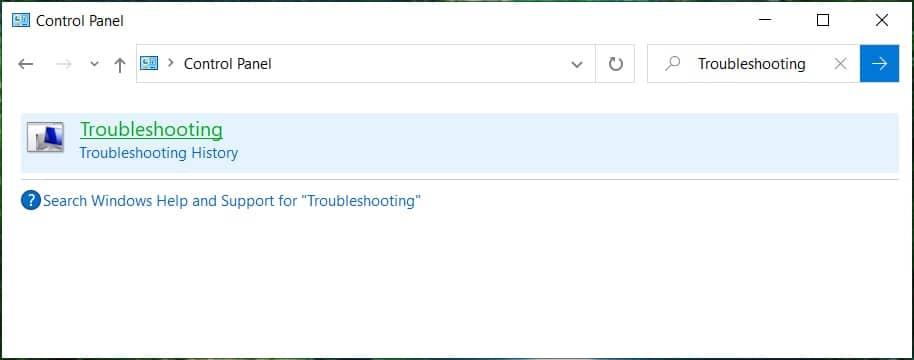
In control panel search Troubleshooting in the Search Bar on the top right side and then click on Troubleshooting.
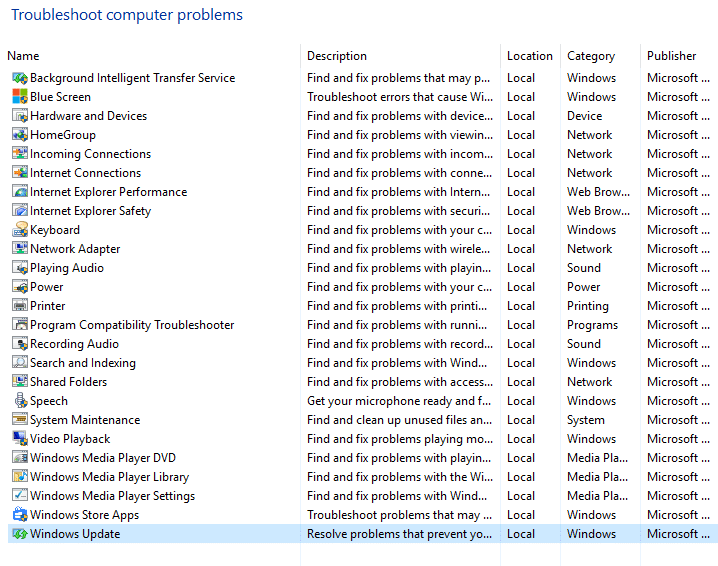
Next, from the left window, pane select View all.
Then from the Troubleshoot computer problems list select Windows Update.
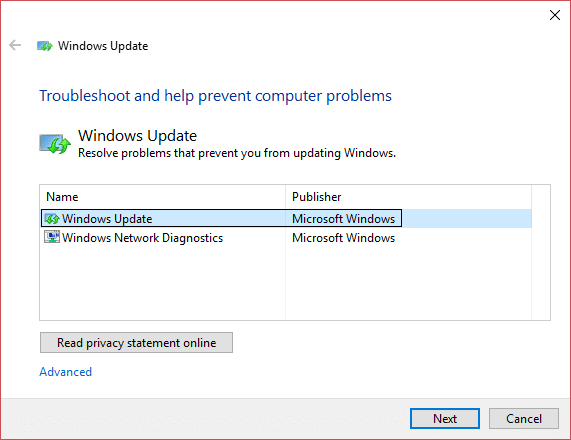
Follow on-screen instructions and let the Windows Update Troubleshoot run.
Restart your PC and see if you can fix Windows Update Error 80246008.
Method 4: Reset Windows Update Components
Open Command Prompt. The user can perform this step by searching for ‘cmd’ and then press Enter.
Type the following command into cmd and hit Enter after each one: net stop bits net stop wuauserv net stop appidsvc net stop cryptsvc
Delete the qmgr*.dat files, to do this again open cmd and type: Del “%ALLUSERSPROFILE%\Application Data\Microsoft\Network\Downloader\qmgr*.dat”
Type the following into cmd and hit Enter: cd /d %windir%\system32
Reregister the BITS files and the Windows Update files. Type each of the following commands individually in cmd and hit Enter after each one:
To reset Winsock: netsh winsock reset
Reset the BITS service and the Windows Update service to the default security descriptor: sc.exe sdset bits D:(A;;CCLCSWRPWPDTLOCRRC;;;SY)(A;;CCDCLCSWRPWPDTLOCRSDRCWDWO;;;BA)(A;;CCLCSWLOCRRC;;;AU)(A;;CCLCSWRPWPDTLOCRRC;;;PU) sc.exe sdset wuauserv D:(A;;CCLCSWRPWPDTLOCRRC;;;SY)(A;;CCDCLCSWRPWPDTLOCRSDRCWDWO;;;BA)(A;;CCLCSWLOCRRC;;;AU)(A;;CCLCSWRPWPDTLOCRRC;;;PU)
Again start the Windows update services: net start bits net start wuauserv net start appidsvc net start cryptsvc
Install the latest Windows Update Agent.
Reboot your PC and see if you’re able to fix the issue. Recommended:
Fix Can’t adjust screen brightness in Windows 10 How To Fix BackgroundContainer.dll error on Startup Fix Network Adapter Error Code 31 in Device Manager Fix ERR_CONNECTION_ABORTED in Chrome
That’s it you have successfully Fix Windows Update Error 80246008 but if you still have any queries regarding this guide then feel free to ask them in the comment’s section.