In this article, I will show you how to erase data on your iPhone in four ways: using factory reset, iTunes, iCloud, and Umate Pro.
Four Ways To Erase Data On iPhones
Before we get started, it is important to note that when you erase data on your iPhone, there is typically no way to recover it. So, if you have any important data or files that you want to keep, make sure to back them up before proceeding. One of the best apps to do this is iTransor, which can backup and restore over 18 types of data, like messages and contacts, from your iPhone without iTunes or iCloud. It costs $39.95 for 5 iOS devices for 1 year and $49.95 for 10 iOS devices for 1 year.
With that out of the way, let’s proceed to the methods for erasing data on iPhone!
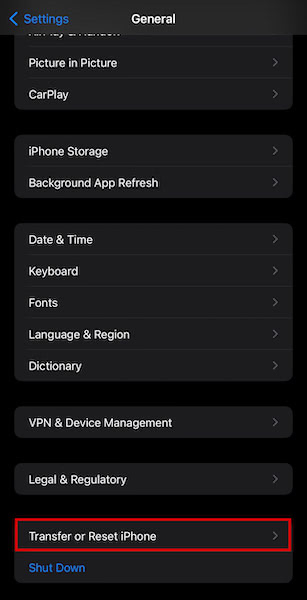
Using Factory Reset
The quickest and easiest way to erase data on your iPhone is to use the factory reset feature. When you factory reset iPhone, you will erase all the content and settings and restore it to the factory default settings. Here’s how to do it: Here’s a detailed video from Apple Support showing how it’s done:
Using iCloud
Another way to erase iPhone files and data is to use iCloud. iCloud is the native cloud iPhone storage service found on Apple devices. It allows you to store data like photos, videos, and music in the cloud. This data syncs across all your Apple devices. All Apple devices come with a free 5GB of iCloud storage, but you can always upgrade to a paid plan if you need more storage space. The upgrades costs $0.99 per month for 50GB, $2.99 per month for 200GB, and $9.99 per month for 2TB. Deleting your iCloud will delete all the data that you have on it.
- Go to privacy.apple.com. You can do this on either your phone or your desktop.
- You’ll be asked to sign in to your account. Enter your email address and your Apple ID password.
- Click Allow when it asks you to confirm your sign-in.
- Enter the code for Two-Factor-Authentication.
- Once you’re in, you’ll see various options under Manage your data. At the very bottom, you’ll see the option to delete your account. Click “Request to delete your account.”
- The next page will show a long list of reminders. Apple wants to make sure that you know the risks of deleting your account. You also have to let them know why you want to delete your account.
- Once you’re done reading, select a reason for the account deletion and click Continue. This will delete all of the data associated with your iCloud account from your iPhone. Again, deletion is permanent, so make sure that you backed up your device first before you do this process.
Using iTunes
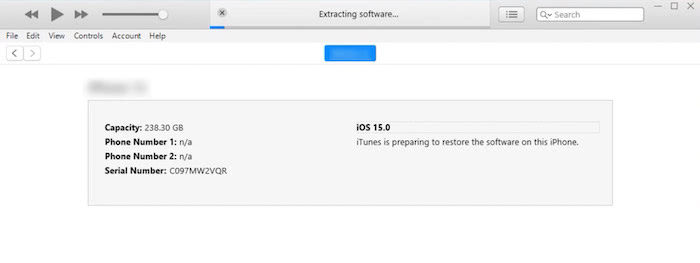
iTunes is Apple’s official software for managing your iPhone. You can use it to sync music, videos, and other data to your iPhone. iTunes is also a great way to erase iPhone files and data without your Apple ID password. Not to mention, it’s relatively simple to do. Just follow these steps:
- Launch iTunes and connect your iPhone using the correct cable.
- A phone icon should appear on the top left corner of the window. Click it.
- Next, click the Restore iPhone option on the right side.
- A pop-up window will appear asking if you want to back up your phone first before resetting it. If you haven’t made a backup yet, it might be a good idea to back up your device first. If you just want to proceed to the restoration, simply click Don’t back up.
- iTunes will ask you for confirmation. Click Restore.
- Wait for iTunes to finish resetting your phone.
- Once the process is done, your iPhone will now be erased and restored to its factory settings.
Using Umate Pro
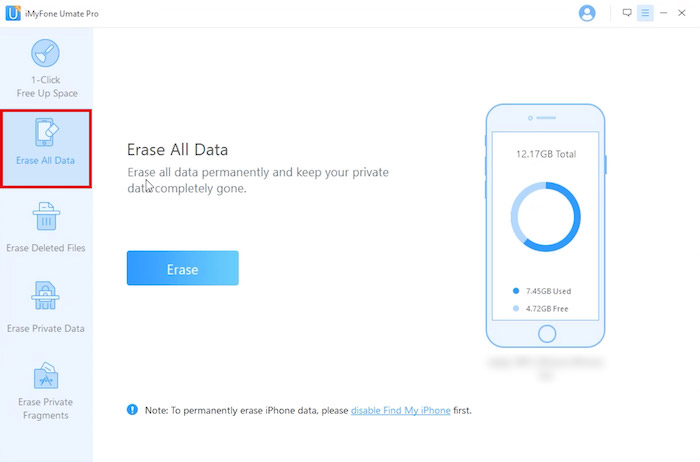
If you want a more complete solution to permanently erase data on your iPhone, we recommend using Umate Pro. This is a professional iPhone data eraser that can completely wipe all of the data from your iPhone. It can also erase previously deleted files, as well as any hidden or encrypted data. This makes it an ideal solution for those who are looking to sell their iPhone. Umate Pro also has other features, like the ability to compress and delete photos, as well data from apps. Apps like Facebook and WhatsApp often leave behind a lot of data, even after you’ve deleted them. Umate Pro can help you clean up this data to free up more space on your phone without deleting anything important. Additionally, Umate Pro features a special three-level deletion option.
Low-level deletion means your data will be removed from your device, and it’s twice as fast as the other detection levels.Medium-level deletion means your files will be overwritten so that even if they get recovered, they won’t contain the same information as the original files.High-level deletion will ensure that even your sensitive information like bank logins will be completely unrecoverable from your phone.
As you can see, the higher deletion levels make it extremely convenient if you’re 100% sure that you want to destroy all your data forever – the downside is that you can’t get it back no matter what, so make sure you back up everything important. Umate Pro costs $29.95 for a single license and $39.95 for a family license, which can be used on up to 5 devices. A free trial is also available if you want to try it out first. Here’s how to use Umate Pro to erase iPhone data:
- Launce Umate Pro and connect your iPhone to your computer.
- Once it is connected, make sure you’re on the “Erase All Data” tab at the side.
- Next, tap Erase.
- As mentioned above, you can change the security level of your deletion process. 5. Pick the one you’re most comfortable with and click OK.
- Type delete to confirm your decision and click Erase Now. Once you do, all of the data on your iPhone will be erased. Do you think you might like Umate Pro? You can find it here!
Erasing iPhone Data: In Conclusion
As you can see, erasing your iPhone data isn’t difficult at all. In this article, I presented four ways that you can do it: restoring your iPhone to factory default, using iTunes to restore your phone, erasing your iCloud account, and using Umate Pro. If you want a more complete solution, I recommend using Umate Pro. This is a professional iPhone data eraser that can remove all traces of your deleted files, making sure that you’re completely safe from potential problems down the road. Did you like this article? Do you have any questions? Let me know below! Save my name, email, and website in this browser for the next time I comment. Notify me of follow-up comments via e-mail.
Δ