There are two inescapably good reasons for using the miniDSP EARS test rig to measure headphones. Namely, its low price and ease of use. It’s a mere fraction of the cost of a professional measurement rig, and the ready availability and beginner friendliness of the EARS mean that its user base of headphone enthusiasts will continue to grow. The miniDSP EARS includes very good instructions and documentation for beginners. It works well with the free and generally well-regarded Room Equalization Wizard (REW) software. It works on Windows, Apple OS, and Linux without installing drivers. Win. Win. Win. The goals are to:
As closely as possible replicate the same measuring conditions between multiple reviewers and across multiple headphones. To be transparent in methodology. To maximize consistency across all measurements regardless of location or operator.
The process will be broken up into three parts:
Physical Setup
Work Space
First, let’s discuss the room in which measurements will be done. Ideally, this room should be SILENT and must not be interrupted during measurements. This is to ensure that no exterior sounds leak into the measurements. This means no background videos or music while performing measurements. Turn off audible cell phone notifications. Move away from (or better yet, shut off) devices like fans, air conditioners, or refrigerators. Remove anything possible that may make noise. The EARS itself should be firmly supported on a solid base. My measurements are done on my small writing desk in a corner of my basement. Admittedly the soundproof foot-thick concrete walls around me are marred by windows, but they remain closed during testing time.
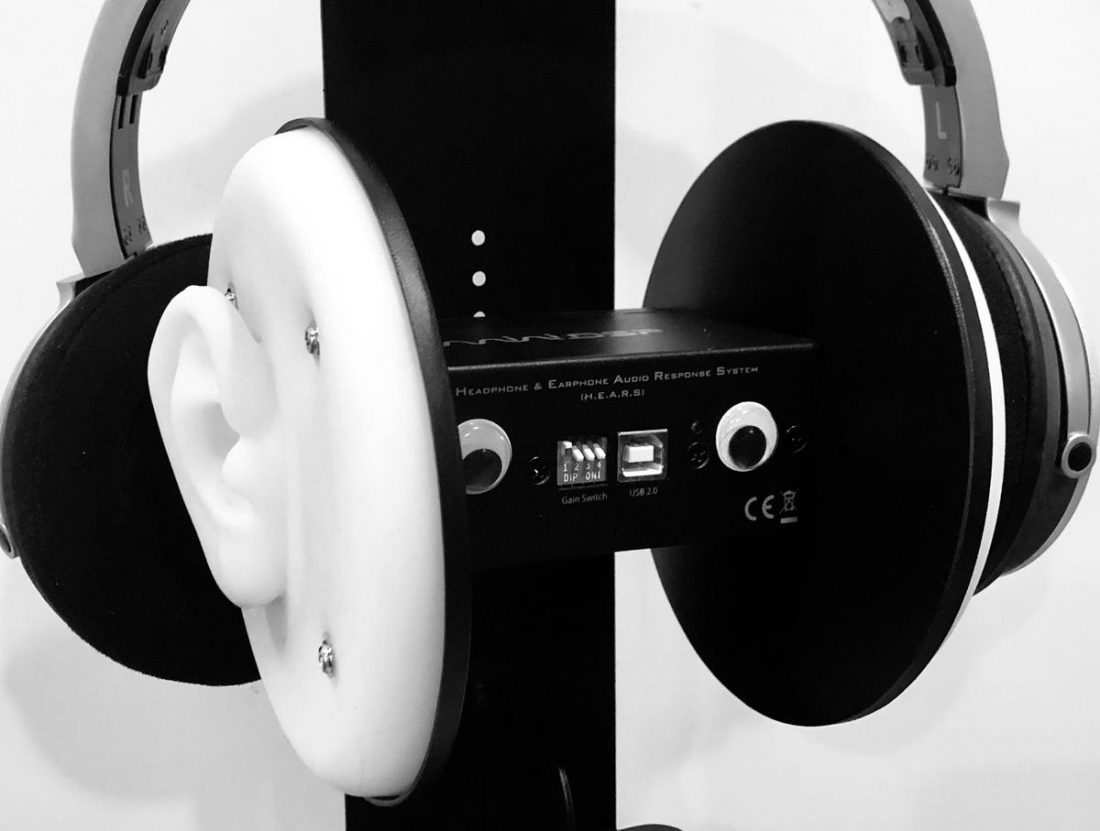
EARS Unit Adjustments
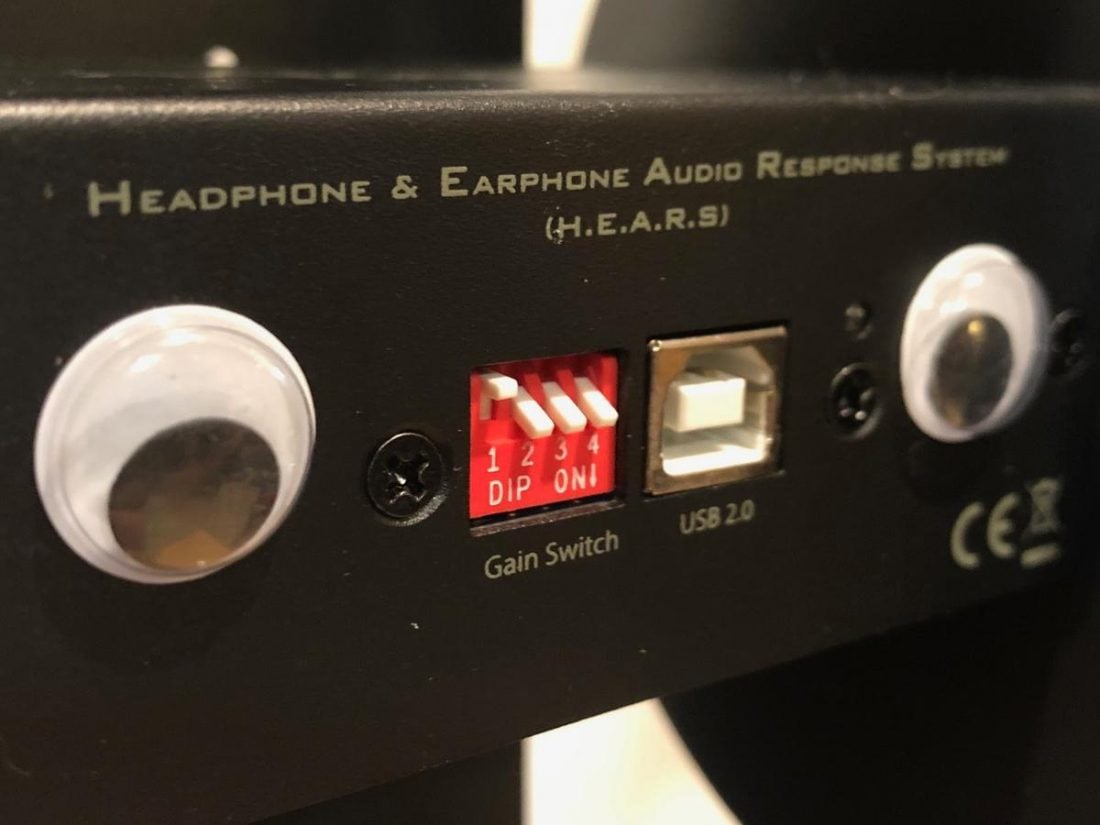
I have found it unnecessary to adjust the height of the EARS unit from how it arrived – the screws remain in the fourth hole from the top and the second hole from the bottom. Full-sized headphones easily adjust to fit this size. Low frequencies in particular are susceptible to external noise. Even if you cannot hear (or are not aware of) external noise sources, they can still show up in your measurements. If you are not getting consistent measurements at low frequency, external noise is the most likely reason. Try and keep the space around the EARS clear of other objects, and keep both sides similar. For example, don’t position the EARS so one channel is next to a wall and the other is facing into the room.” – EARS User Manual The internal microphone gain DIP switches (located on the front of the unit) should be left in their default (18 dB) positions as well: 1 up, 2 down, 3 down, 4 down.
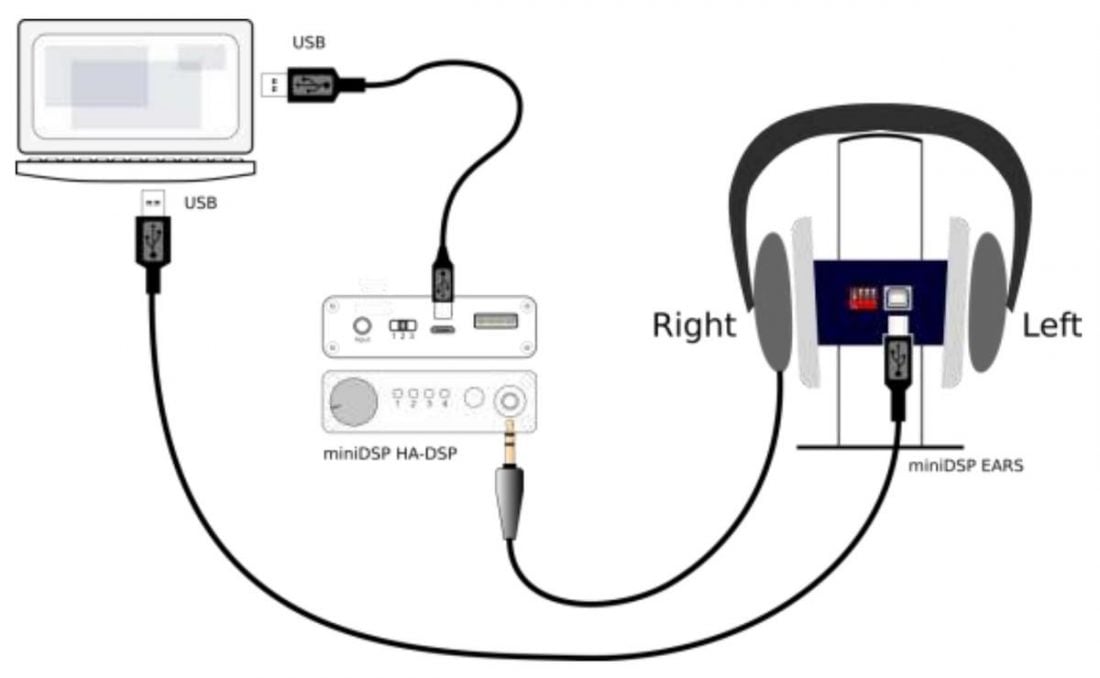
DAC and Amplifier Requirements
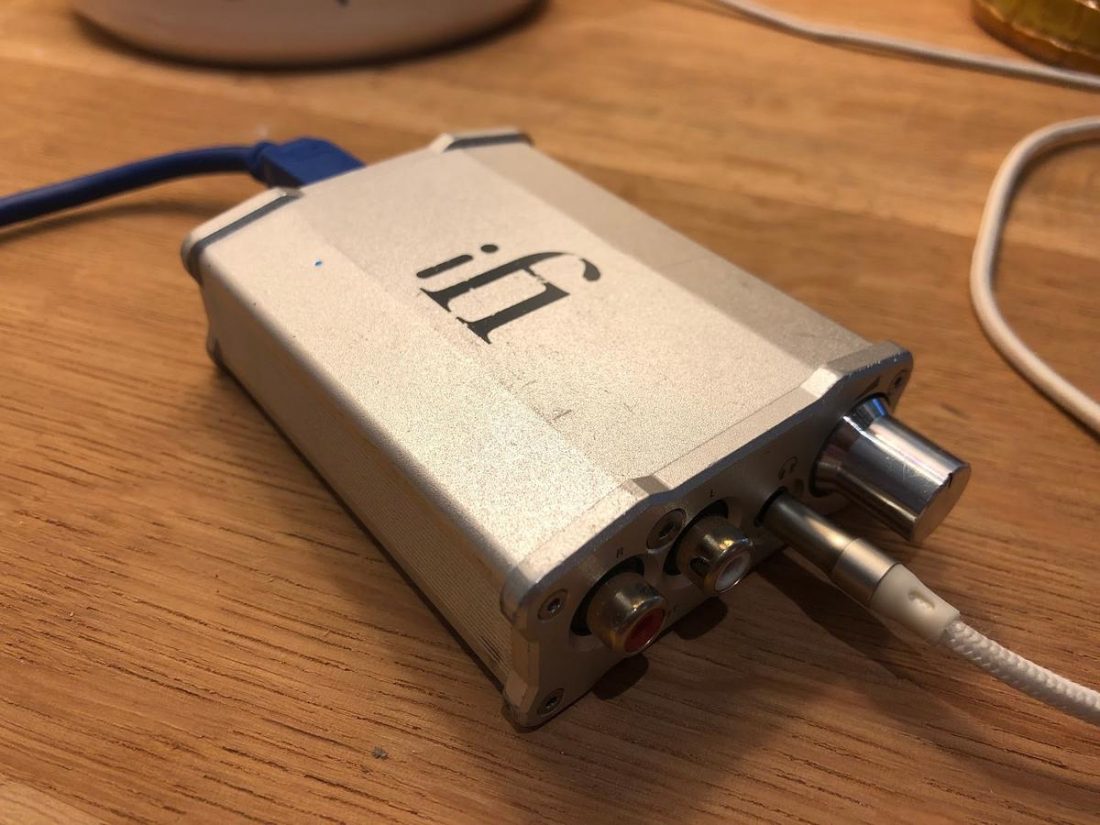
In order to make a measurement, you must use a stand-alone, high-quality DAC and amplifier to generate tones and to calibrate the miniDSP EARS. I’m using an iFi iDSD Nano connected via USB to an older 2012 MacBook Pro. The Nano is a basic, but clean and reasonably competent device that will power most headphones properly. I would suggest using an amplifier with a hardware volume control. The process requires calibrating the output for every pair of headphones measured. This must be done by adjusting the volume to a set output level, which requires more or less amplification depending on the sensitivity and impedance of the headphones being measured. An external knob simplifies the process and allows for some fine-tuning.
Computer Setup
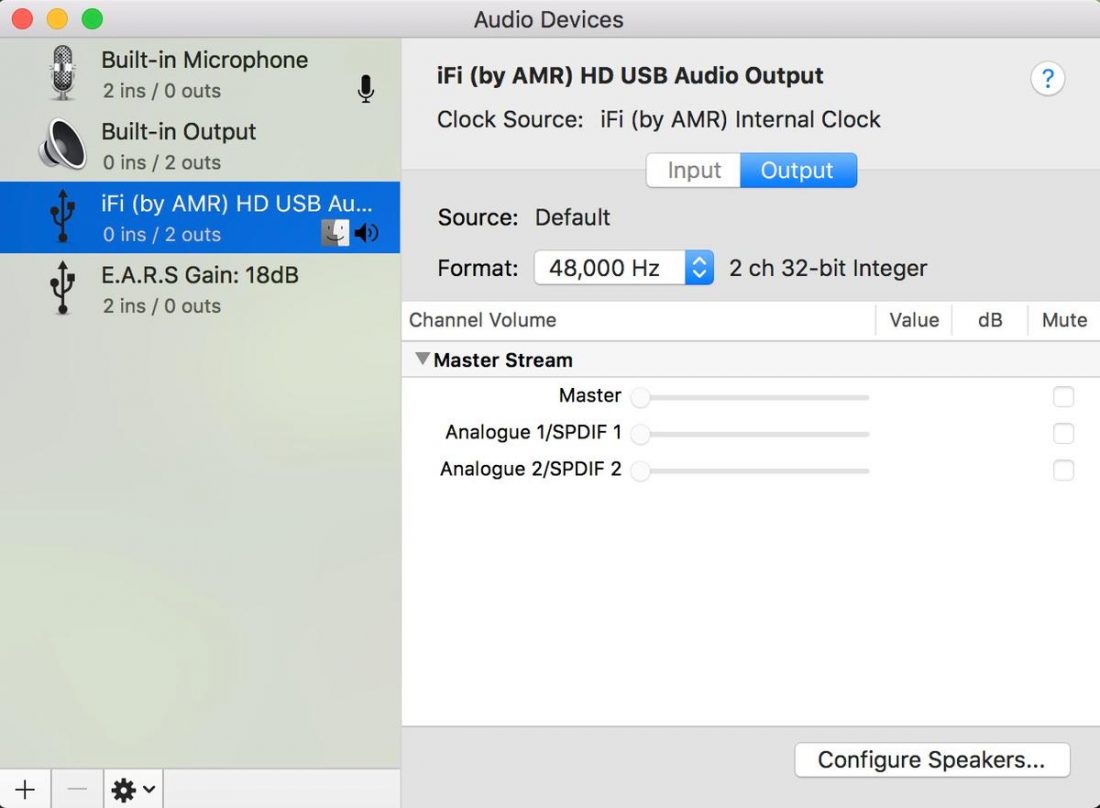
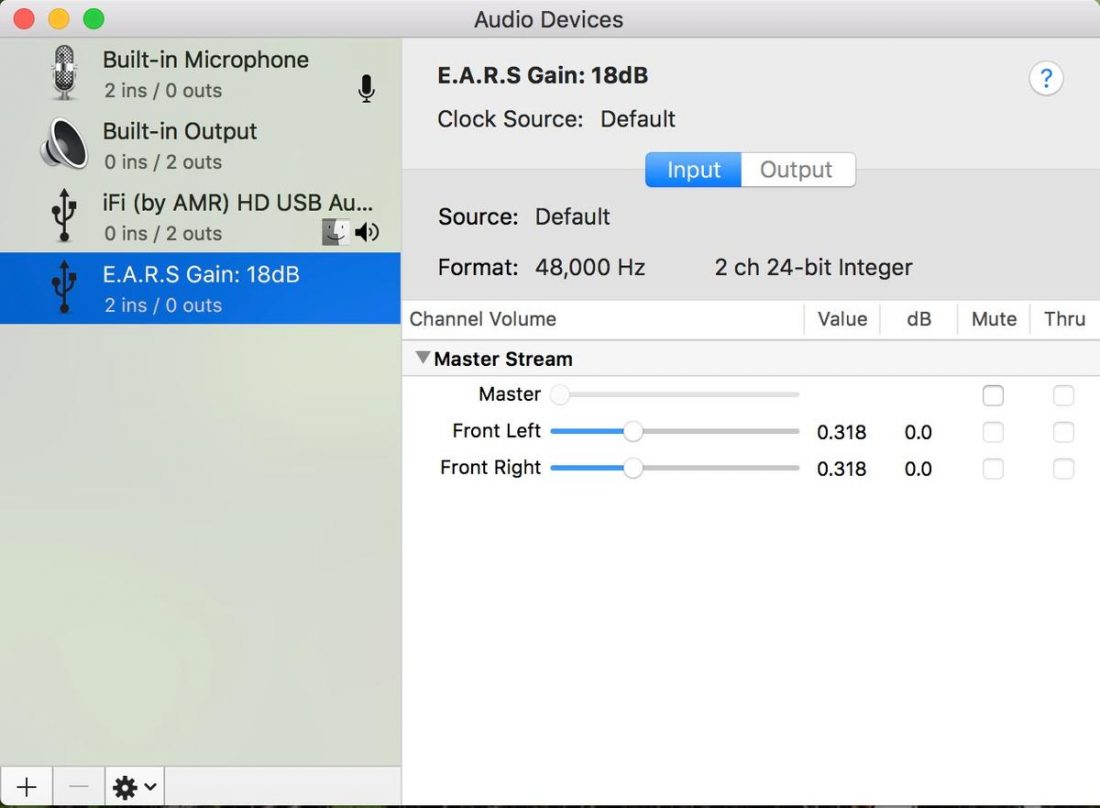
Two things must be set on your computer before proceeding with measurements. Firstly, the sample rate of the DAC must be set to 48 kHz. This is the rate that the EARS is expecting. Secondly, the input gain of the EARS must be set to 0 dB. Both the Sample Rate and input gain are modified in the MIDI Audio Setup app in Apple OS and in the Sound Control Panel Properties – Levels tab in Windows.
REW Software Setup
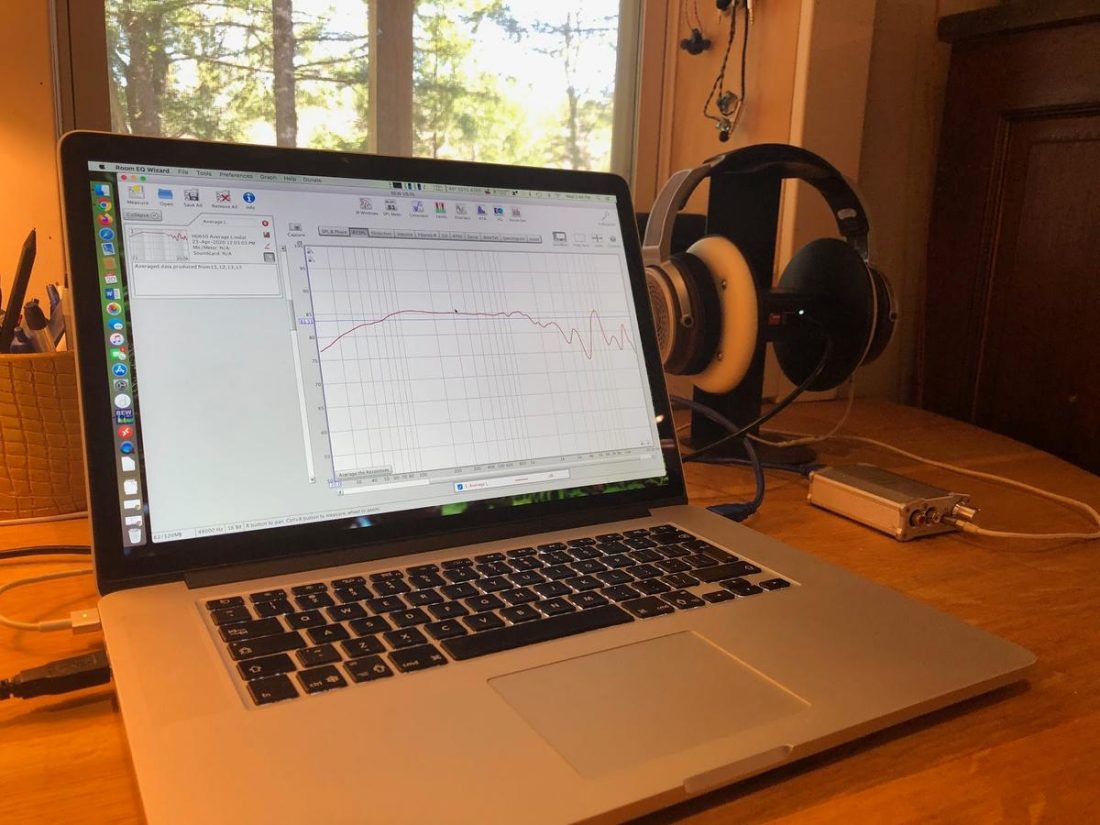
Room EQ Wizard Software
The fantastic and free Room EQ Wizard (REW) software is the heart of the measurement process. I selected version 5.15 of REW to best match the current EARS documentation. The 5.15 version is available for download from here.
Determine SPL Calibration Target
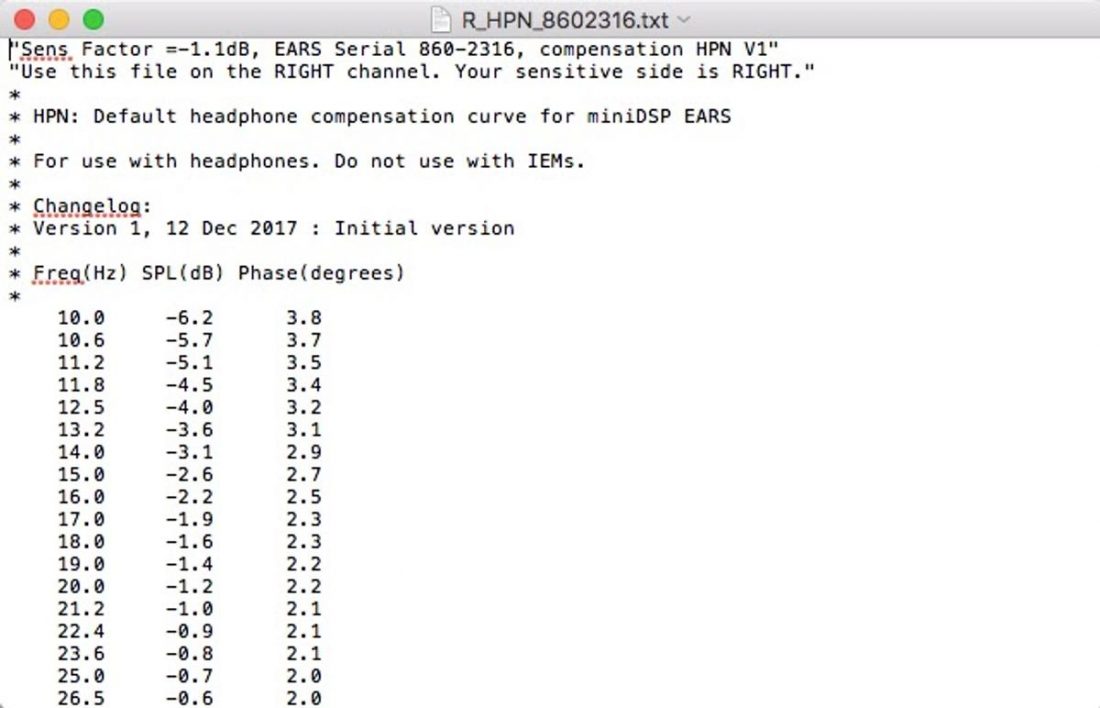
Write down the Sensitivity Factor (Sens Factor) and Sensitive Channel (sensitive side) of your specific EARS device. This information is found at the top of the calibration files. For example, my EARS sensitivity factor and sensitive channel are:
-1.1 RIGHT
Use the sensitivity factor to determine the SPL Calibration Targets for headphones and IEMs. For headphones, this is -40 + sensitivity factor. For IEMs, this is -30 + sensitivity factor. For example, the SPL Calibration Targets for my ears are:
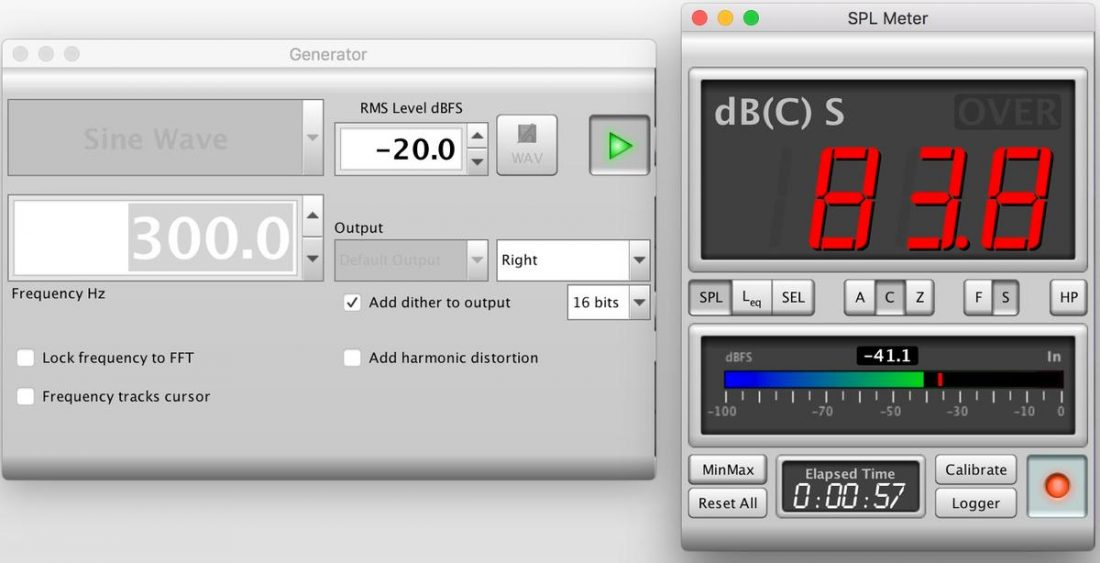
Headphones: (-40 + -1.1 =) -41.1 IEMs: -31.1
These values will be used on the REW SPL Meter window.
REW Preferences
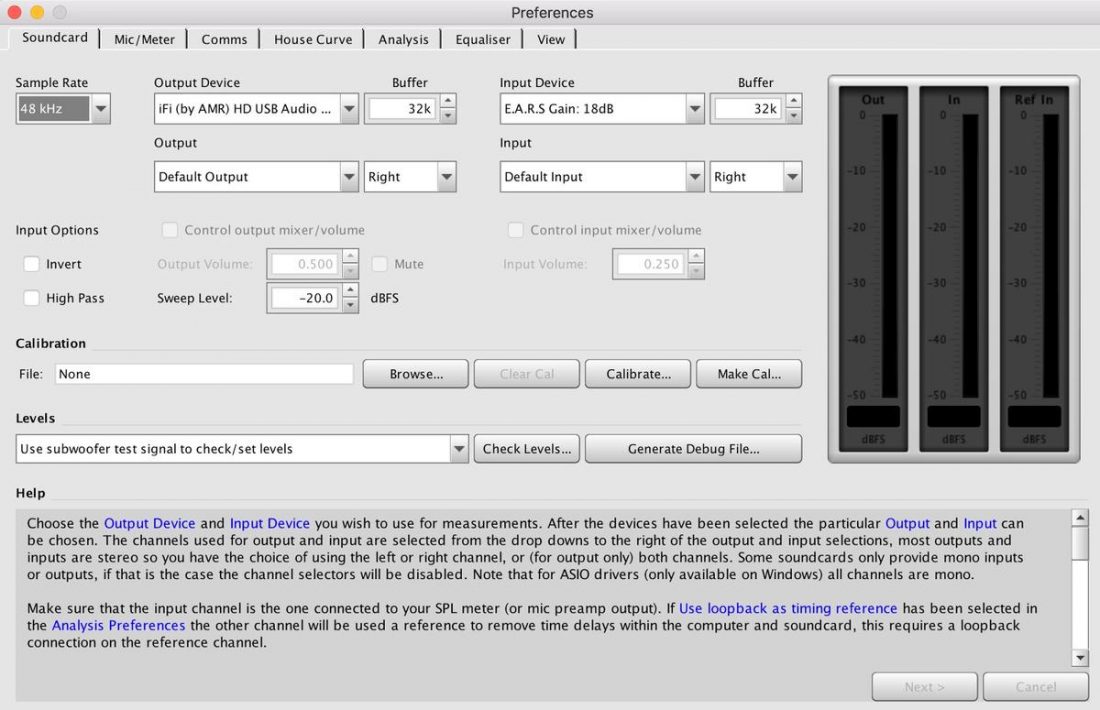
Press the Preferences button on the REW toolbar. In the Soundcard tab in REW Preferences, set the following:
Sample Rate: 48 kHz Output Device: Your DAC/Amp Input Device: E.A.R.S Gain 18 dB Output: Default Output – Choose your Sensitive Channel (for my EARS this is RIGHT) Input: Default Input – Choose your Sensitive Channel (for my EARS this is RIGHT) Sweep Level: -20 dBFS
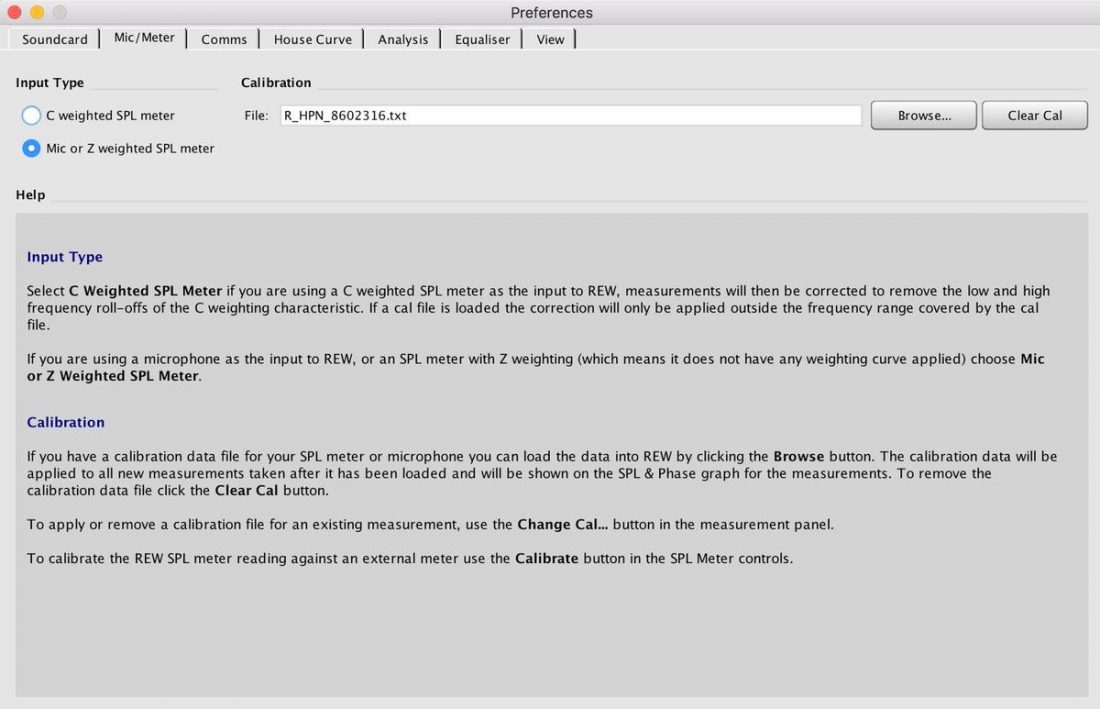
Mic/Meter Tab
Mic or Z weighted SPL meter: selected Calibration File: Select the downloaded calibration file for your EARS. Select L or R (left or right) depending on the channel being measured.
IEMs: IDF (for my EARS this is: R_IDF_8602316.txt) Headphones: HPN (for my EARS this is: R_HPN_8602316.txt)
Calibration Files
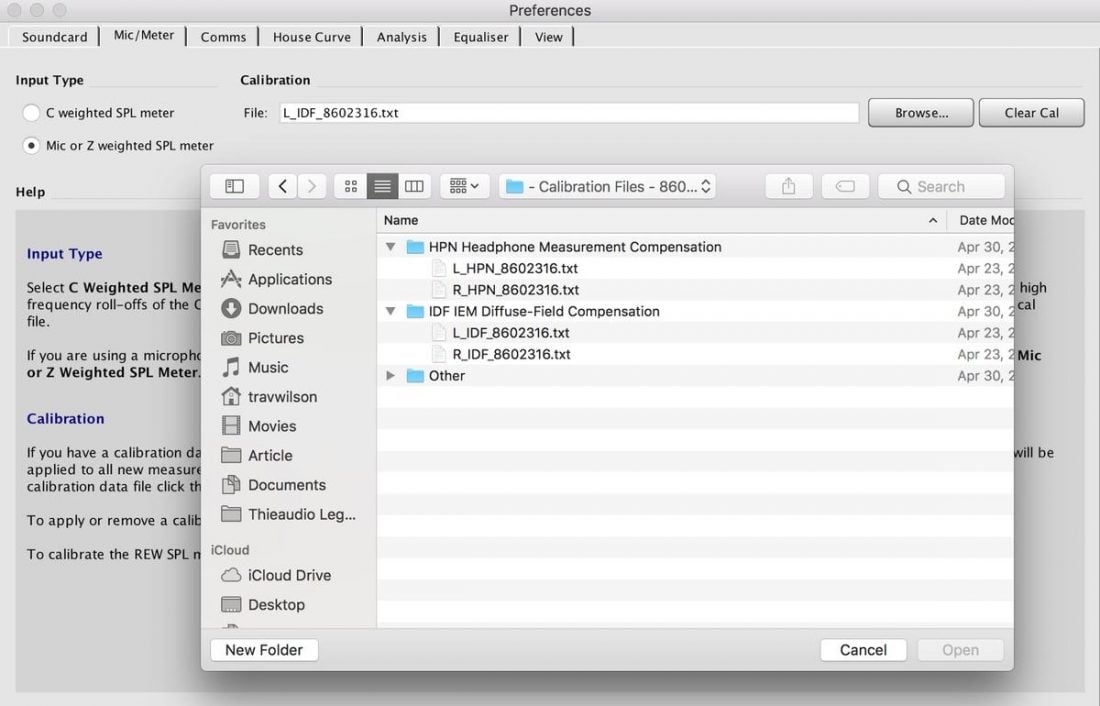
miniDSP provides 4 different types of calibration files for the EARS. One is RAW (minimal compensation), one is for IEM measurement (IDF), and there are two for headphones (HEC and HPN).
miniDSP EARS Files/Calibration Files – 860-2316/HPN Headphone Measurement Compensation/ miniDSP EARS Files/Calibration Files – 860-2316/IDF IEM Diffuse-Field Compensation/
For simplicity’s sake, we will perform measurements using the IDF files for IEMs and the HPN files for headphones. The appropriate file must be loaded into REW before running a measurement. The calibration files serve three purposes:
- Correct the frequency response between the individual (left and right) microphone capsules.
- Correct for any SPL sensitivity difference between the left and right capsules.
- To apply a compensation so that the produced measurement is more easily and usefully interpreted. The calibration files provide compensation for the particular characteristics of the measurement rig, and there are ongoing debates and discussions as to what is the ‘right’ compensation to use. All measurement devices typically use some type of compensation. The four different calibration files types are:
- IDF – IEM Diffuse Field Compensation – Based on the Etymotic ER4SR.
- HPH – Headphone Measurement Compensation – Intended as a basis for headphone measurements.
- HEQ – Headphone EQ Compensation – Intended as a basis for subsequent headphone EQ changes.
- RAW – The raw measured response calibrated for the microphone capsules.
View Tab
Full scale sine rms is 0 dBFS: unchecked (off).
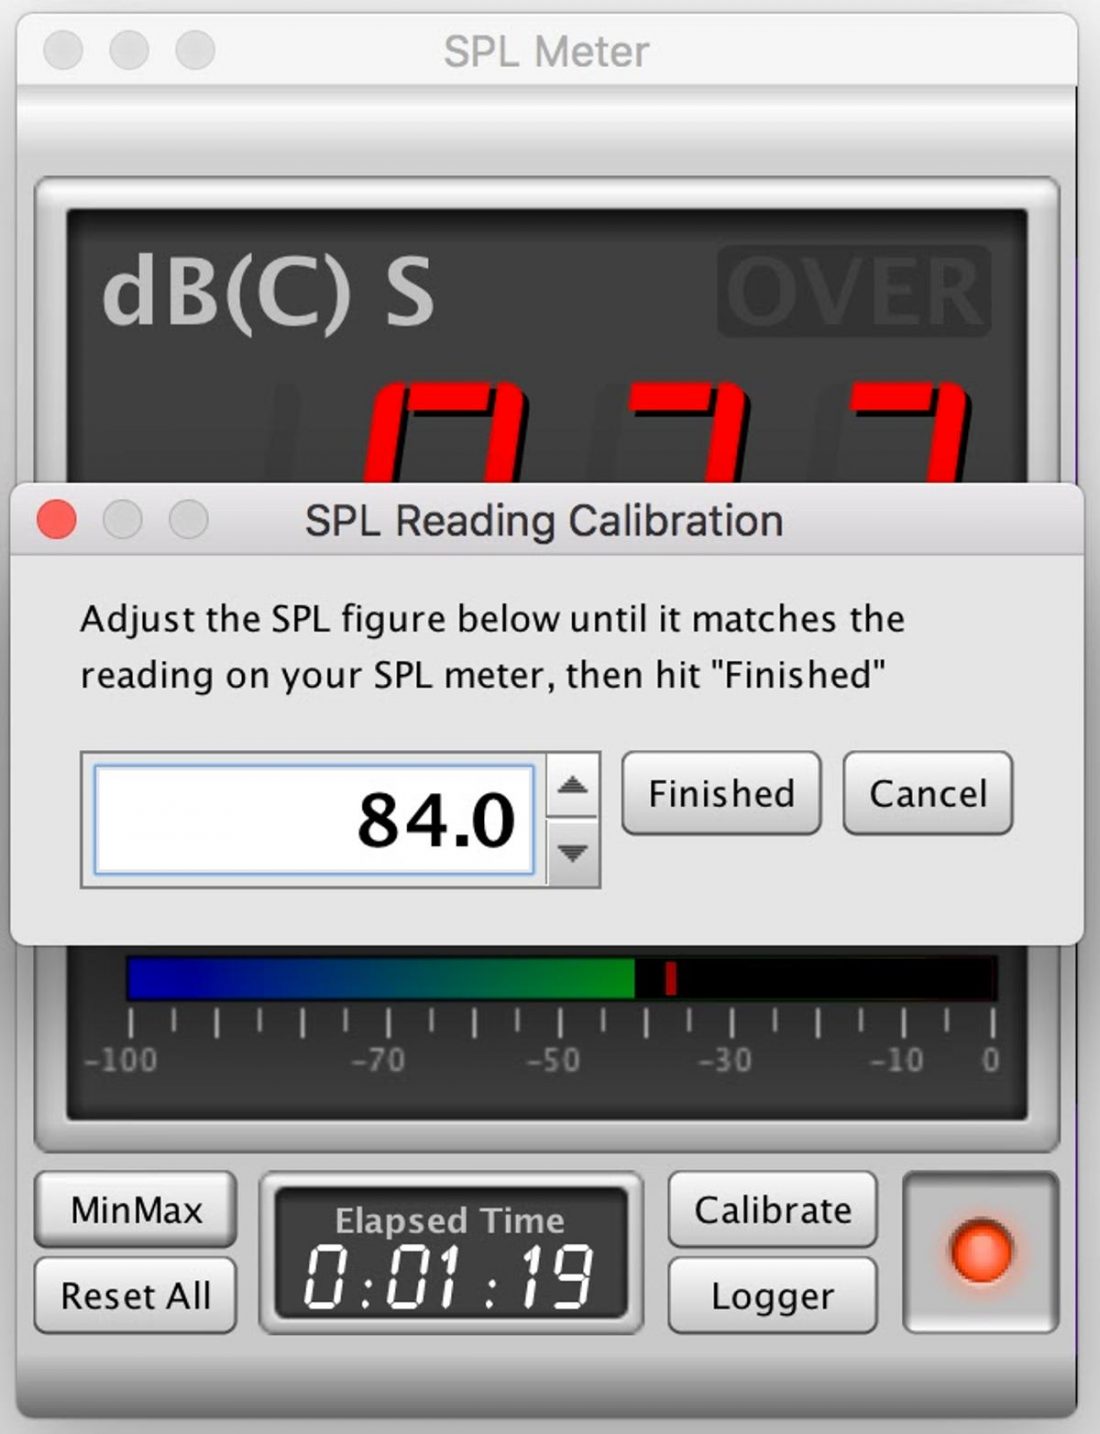
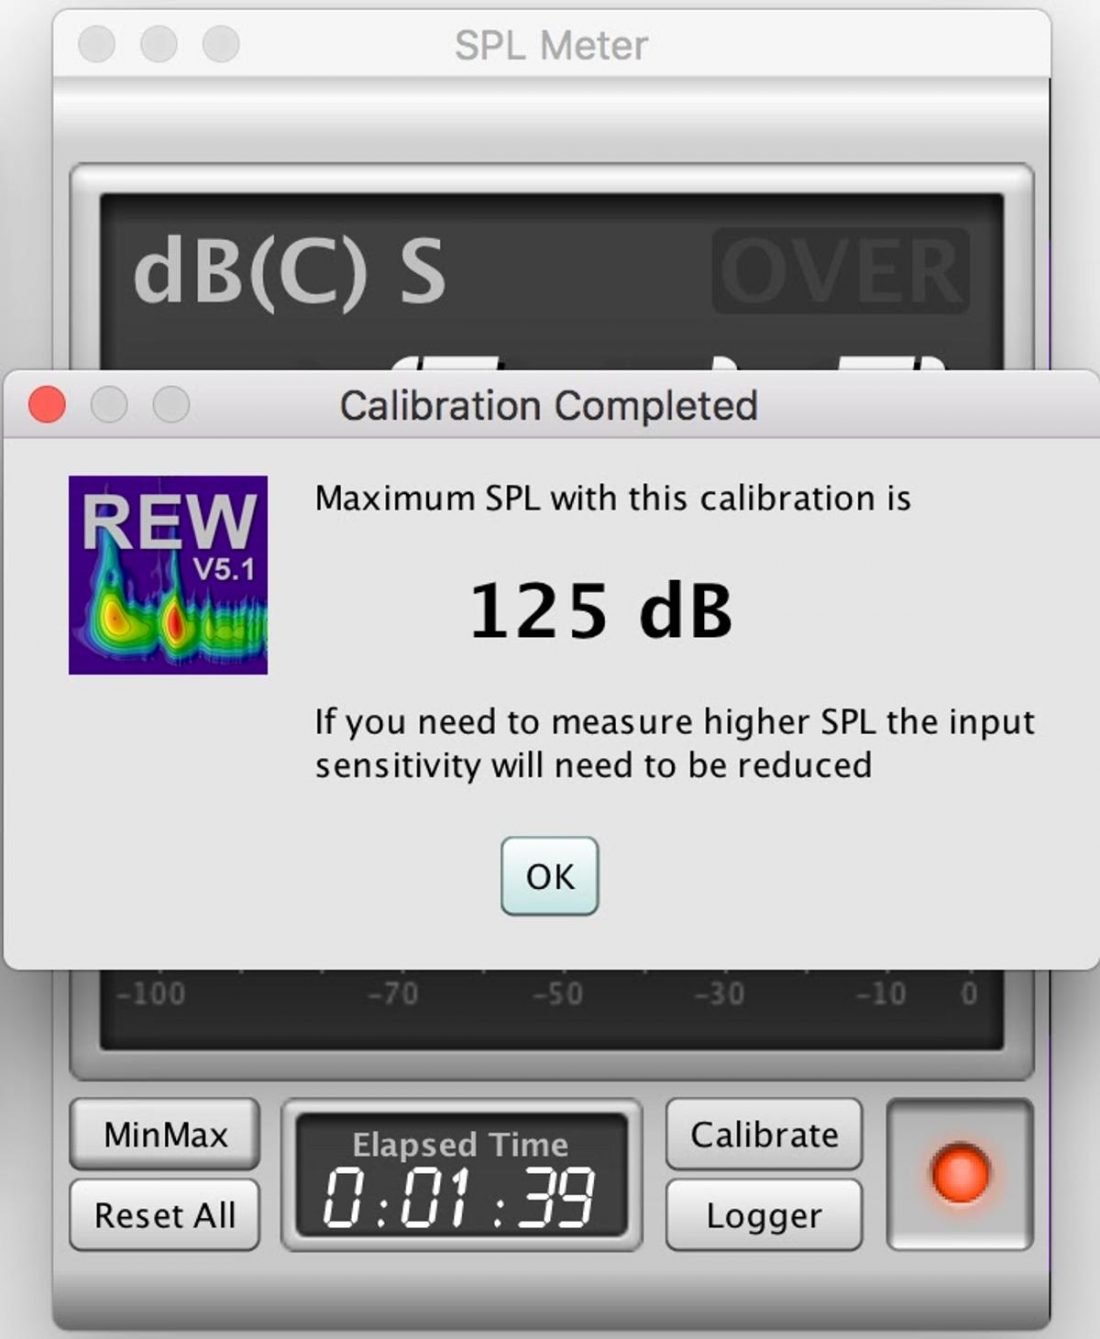
SPL Calibration
Each time a new pair of headphones (or IEMs) are being measured, the sound pressure level (SPL) must be calibrated.
REW Generator Window
REW SPL Meter Window
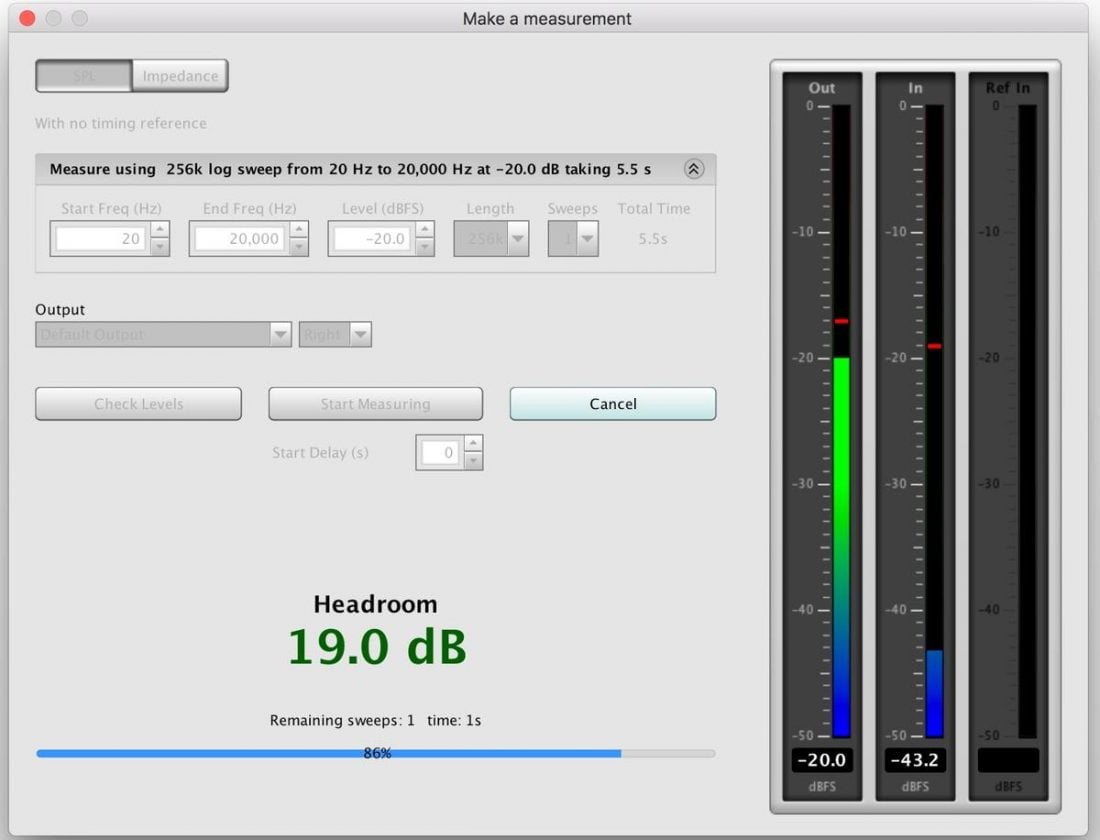
Performing Measurements
The measurement process only takes a few seconds to complete. The first frequency response graph will be displayed. Repositioning the headphones and running a minimum of 5 measurements per channel is necessary to identify and remove abnormal or outlier measurements. 5 valid measurements can then be averaged for a relatively accurate side measurement (left or right graph).
Measuring the Other Channel
Preferences Window
Output: Default Output: SELECT THE OTHER CHANNEL Input: Default Input: SELECT THE OTHER CHANNEL
File: SELECT APPROPRIATE CALIBRATION FILE FOR THE OTHER CHANNEL
Frequency Response Graph
This is where the measurement results are displayed. It’s the most common and useful graph we have to compare how the headphones sound. Start by setting several defaults for all measurements:
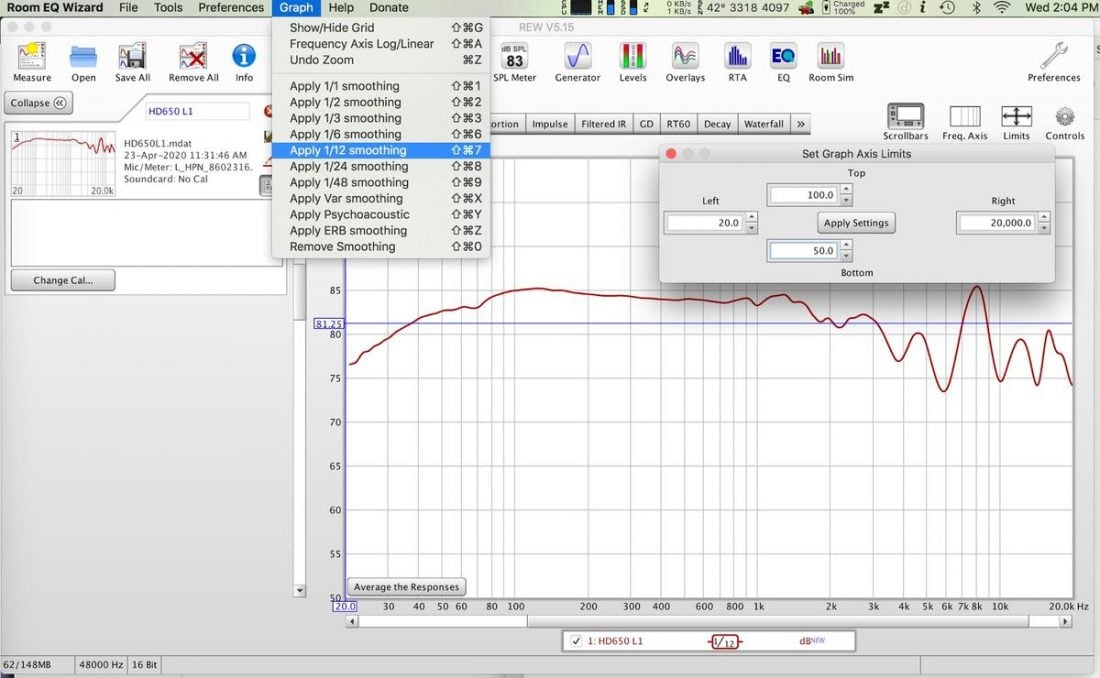
Use the Limits button to set the graph to display 20-20,000 Hz on the x-axis and 50-100 dB on the y-axis. Select the All SPL tab above the graph. After each measurement, from the Graph dropdown menu select: Apply 1/12 smoothing. This smooths the line using 1/12 octave smoothing.
After smoothing, save each measurement in the format:
HEADPHONE NAME – SIDE MEASUREMENT NUMBER. For example: “HD650 L1.mdat”
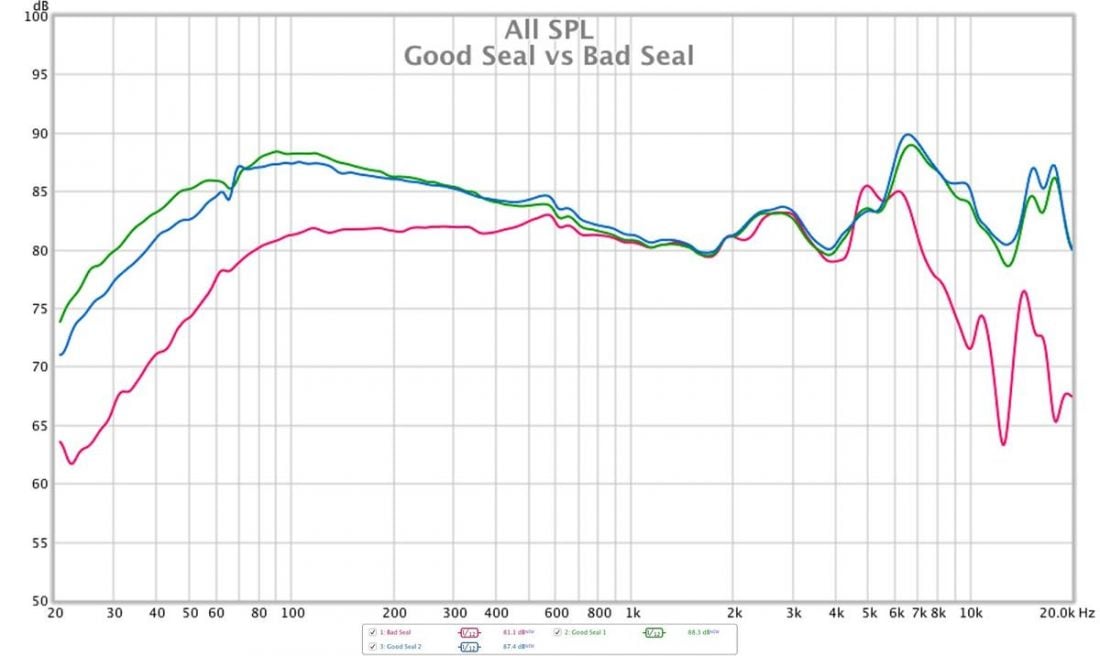
Physically reposition the headphone on the EARS measurement rig. This may be done by entirely removing the headphones and placing them on again, or by rotating or sliding the headphones around on the EARS. Try to position them naturally over the silicone ears while maintaining a good seal with the ear pads. Perform another measurement as outlined above. Discard any erroneous measurement that is clearly incorrect. Repeat until you have created 5 valid measurements for each side. Press the Average the Responses button at the bottom of the graph to create an average of all the measurements currently displayed in the All SPL tab. You can Open or Close measurements as appropriate to finally save a file as:
HEADPHONE NAME – Avg – SIDE. For example: “HD650 Avg L.mdat”
The Capture button at the top is used to create a picture of the graph that can be used to post online.
Image Width: 2000 Include Title: checked Include Legend: checked JPEG image: checked Type any additional text here: Title of Graph. For example: “HD650 – Headphonesty”
Summary of Settings and Best Practices
Measurements must be completed in a silent room. The user must provide a decent DAC and headphone amplifier able to properly power the headphones being measured. This device should be the same for all headphones being measured. Use a single version of REW software. I use v5.15 so that it matches the version in the miniDSP instructions. Use the sensitivity factor in a calibration file to determine the specific SPL Calibration Target for your EARS and the Sensitive Channel. Headphones: -40 + sensitivity factor. IEMs: -30 + sensitivity factor. Write these down. Use the SPL Calibration Target to configure REW using the Generator window and SPL Meter for each pair of headphones or IEMs measured. Calibrate to 84 for headphones and 94 for IEMs. Sample Rate: 48 kHz Sweep Level: -20 dBFS Gain Setting: 18 dB Measurement Start: 20 Hz End: 20000 Hz Use the Calibrated HPN (L or R) files provided by miniDSP for the particular EARS rig (based on serial number) for measuring Headphones. Use the Calibrated IDF (L or R) files provided by miniDSP for the particular EARS rig (based on serial number) for measuring IEMs. Default graph settings: Frequency: 20 Hz – 20 kHz. SPL Range: 50-100 dB. Octave Smoothing: 1/12 Repositioning the headphones and running a minimum of 5 measurements per channel is necessary to identify and remove abnormal or outlier measurements. 5 valid measurements can then be averaged for a relatively accurate side measurement (left or right side graph).
Conclusion
As an additional resource, I have posted a couple of videos of the above process to YouTube. Videos: While not perfect, the miniDSP can be a useful tool in comparing the relative performance of headphones and IEMs. The crucial step is to ensure that these measurements are being done as consistently as possible across all headphones being measured and across all miniDSP EARS users.